
How to sell and scan tickets
Everything from setting up a ticket to checking people in at the gate. It's the same guide we email when you add your first ticket.
1When to use tickets
Use a ticket for anything a customer pays for ahead of time and uses or picks up at an event:
- Admission: entry, a day pass, or time on a ride
- Food & drink: a meal, a plate or a drink picked up at your booth
- Merch: a shirt or anything else handed out at the event
- Other: parking, a raffle entry, or anything else
If you mail something to the customer's home, list it as a regular product instead. Tickets and shipped products can't be bought in the same checkout.
2Setting up a ticket
- Connect Stripe from your dashboard's Payouts tab. That's how you get paid.
- Go to Dashboard → Products → Add product and choose Event ticket.
- Pick your event from the list (or type its name and dates), check the venue address, and add the ZIP code.
- Set your Presale price. You can also add a Price at the door. It shows crossed out, so buyers see what they save.
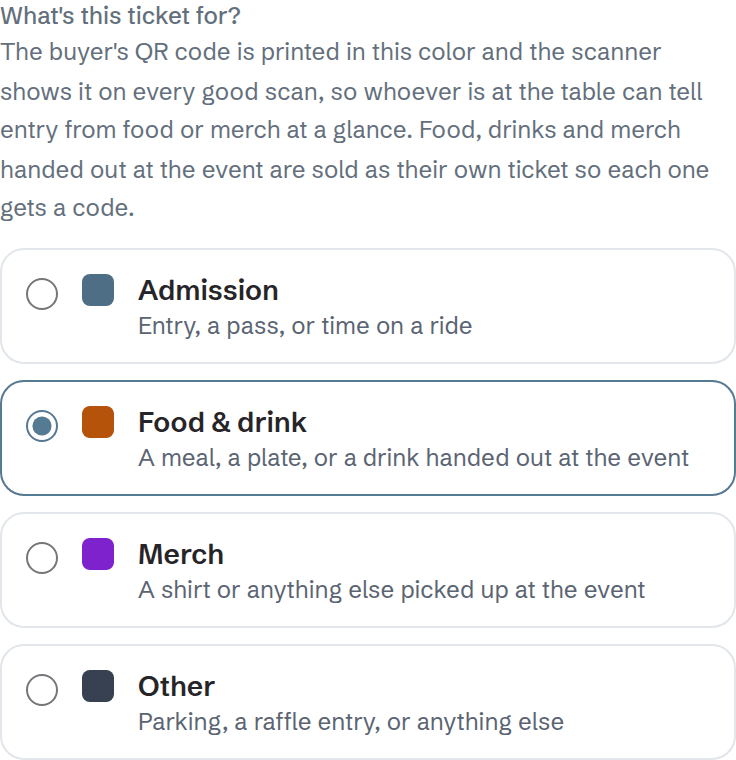
- Choose What's this ticket for? (Admission, Food & drink, Merch or Other). This sets the color of the customer's QR code.
Optional settings:
- Presale ends: after this date and time, the ticket sells at the door price.
- Stop selling tickets: after this, the ticket shows "Sales ended." Left blank, sales stop after the event's last day.
- When it can be scanned: any day, only the event's dates, or only certain dates (like a Saturday-only pass). You can also set a start and end time, and let guests check in a few minutes early.
Selling food or merch too? Make each one its own ticket for the same event, then offer it as an add-on on your main ticket.
Seven days after the event, the ticket leaves your storefront on its own. Once a ticket has sold, it can't be deleted, because customers' QR codes point to it. To stop sales, mark it out of stock.
3What your customers get
After paying, customers get a confirmation email with their QR codes. The same codes are under My Tickets in their Hmong Network account, and they can add them to Google Wallet. They don't need to sign in at the gate: the email or a screenshot works.
4How to tell which QR code is which
Each QR code is printed in its category's color, with the category and product name underneath:
- Blue = Admission
- Orange = Food & drink
- Purple = Merch
- Gray = Other
One QR code covers everything of the same kind in an order. If a family buys 4 admissions and 2 drinks in one order, they get two codes: a blue one for the 4 admissions and an orange one for the 2 drinks. A ticket that's only good on certain days gets its own code for those days.
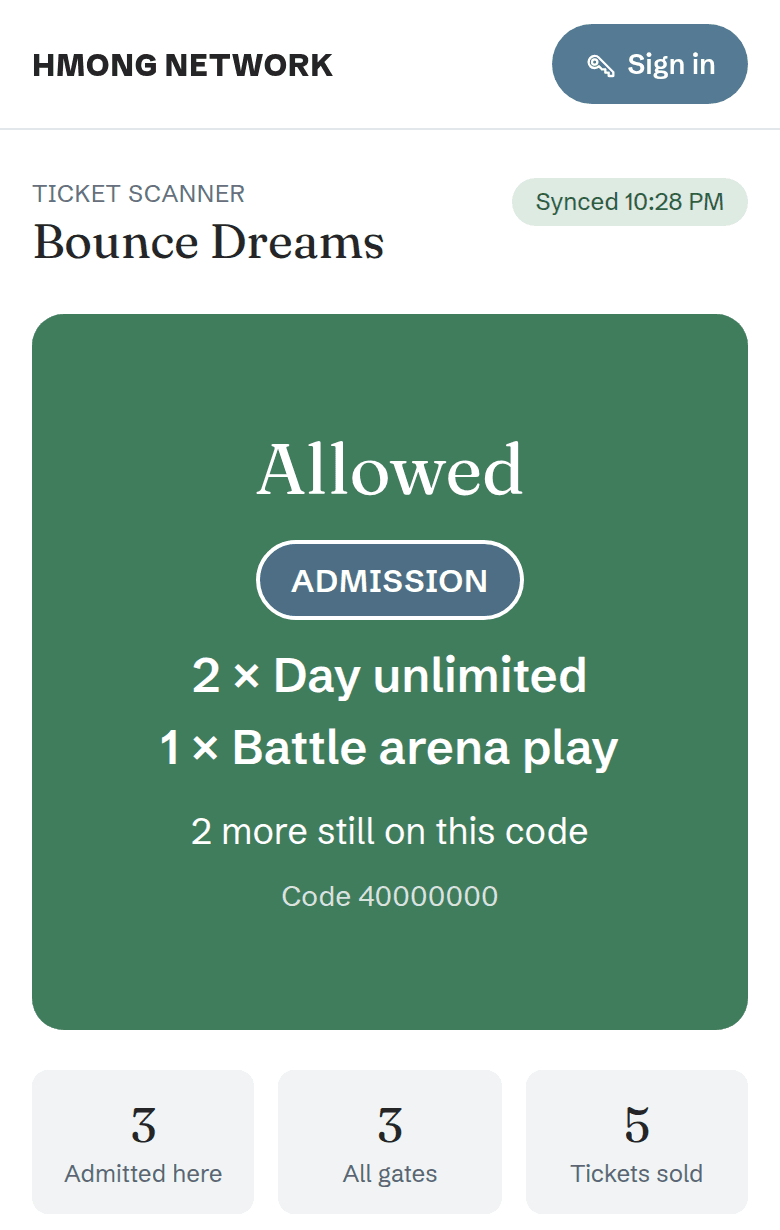
When you scan, the scanner shows the same colored badge and the product name, so you know right away whether to hand over a wristband or a plate. It also lists what each color means under the camera.
5Can a code be scanned twice?
No. Each ticket works once. Scan a code that was already used and the scanner turns red, buzzes, and says Already used with the time it was first checked in.
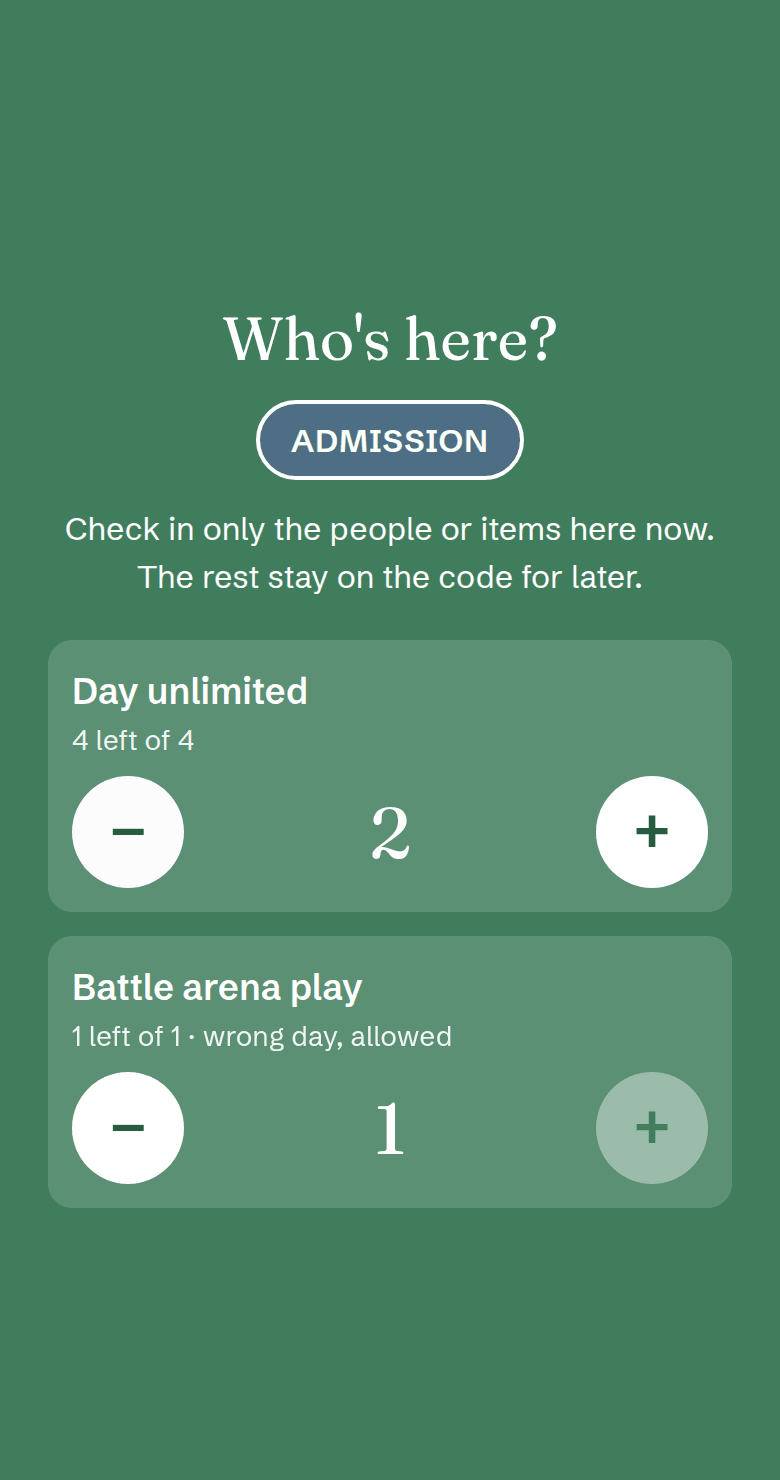
A code with several tickets on it can be checked in bit by bit. If a code has 4 tickets and only 2 people are here, check in 2. The other 2 stay on the code for later. Once all 4 are used, it shows Already used.
Shared screenshots: the first scan wins and the copy shows Already used. The one exception is two scanner phones that are both offline at the same time. Each could let the same code in, since they can't see each other's scans yet. Once they're back online, the scanner lists those under Used more than once. If that matters to you, use one scanner phone per entrance.
6No internet at the venue?
The scanner checks codes on your phone, so it keeps working with no signal. Open it once with signal before the event so it can download your ticket list. Scans upload on their own when signal comes back.
Only the business owner's Hmong Network account can open the scanner. If someone else is running your gate, have them sign in with your account on their phone.

7Event day, step by step
Before the event, where you have signal:
- On the phone you'll use at the gate, sign in to hmong.network with your business account.
- Open hmong.network/tickets/scan (or Dashboard → Products → Open ticket scanner).
- Tap Start scanning and allow the camera. The badge at the top should say Synced.
- Add the page to your home screen or bookmark it. Charge the phone and turn the volume up: the scanner dings for a good ticket and buzzes for anything else.
At the gate:
- Open the scanner and tap Start scanning.
- Point the camera at the customer's QR code, on their phone or on paper.
- Read the screen:
- Green "Checked in" with a ding: let them in or hand over their item. The colored badge and product name tell you what it's for.
- "Who's here?" (a code with several tickets): use + and − to match how many people or items are here now, then tap Check in. The rest can check in later with the same code.
- "Wrong day", "Too early" or "Too late" with a buzz: the ticket isn't good right now. Tap Allow anyway to let them in, or Reject.
- Red "Already used": it was already checked in. The screen says when.
- Red "Ticket cancelled": this ticket was refunded.
- Yellow "Not for this event": the code is for a different business or event.
- Red "Not a valid ticket": the code is damaged or was edited. If it says "Sync this phone, then scan again", get signal, tap the badge at the top, and scan again.
Tap the result to clear it and scan the next person.
During and after: the counters under the camera show Admitted here (this phone), All gates (every phone, as of the last sync) and Tickets sold. When you have signal, tap the badge at the top to sync. It uploads your scans and picks up refunds and other phones' scans.
8Refunds and payouts
You can cancel an order or offer a partial refund from your orders in the dashboard. Refunded tickets stop working: once the scanner phone syncs, they show Ticket cancelled at the gate. Tickets can't be returned like a shipped product.
Ticket money is paid out to your connected Stripe account on our weekly payout. Your payout is the ticket price minus Stripe's card processing fee and Hmong Network's commission, which is 10% unless we've agreed a different rate with you. Your own rate is in the guide email we send you and in your dashboard.
